Can Label Size Explained: Exact Formulas & Machine Tolerances
In the high-stakes world of commercial beverage and food packaging, a miscalculation of a mere 1/8 of an inch is not just a design flaw—it is a catastrophic production failure. Whether you are running a craft brewery, a specialty coffee roastery, or an automated food canning facility, guessing your can label dimensions inevitably leads to massive material waste, unacceptable machine jamming, and compromised brand aesthetics.
The journey from a digital PDF proof to a flawless physical product on a supermarket shelf is fraught with hidden engineering traps. Variables such as the mechanical limits of semi-automatic applicators, the severe physical distortion caused by heat tunnels, and the silent shifts in the global aluminum supply chain can instantly render standard “templates” useless. Industry packaging standards are constantly evolving to meet these demands.
This comprehensive technical guide bypasses amateur design advice and dives directly into the industrial realities of packaging. We will break down the exact mathematical formulas for flat roll labels, the structural geometry of shrink sleeves, the precise methodologies for measuring irregular tins, and the critical machine entry tolerances that dictate your production yield. Stop guessing, and start engineering your packaging for zero-defect manufacturing. Jump to the ultimate size chart below to get started.
The Ultimate Can Label Size Chart (Beverage, Food, and Jars)
Before executing any graphic design or issuing a purchase order to your print provider, you must establish your baseline dimensional framework. The following reference matrix outlines the current industry-standard dimensions for the most heavily utilized food metal tins, aluminum beverage cans, and glass jars. However, as any seasoned production manager knows, these numbers are a starting point, not a universal guarantee.
Food Metal Tins (3-Piece Construction)
#10 Can
#303 Can
#300 Can
Beverage Aluminum Cans (2-Piece Construction)
16 oz Standard
16 oz Sleek
12 oz Standard
12 oz Sleek
8.4 oz Slim
Glass Mason Jars
16 oz Pint
8 oz Half-Pint
The most dangerous trap currently facing beverage startups involves the 16 oz can. Historically, almost all 16 oz cans were standard 211 format. However, due to periodic shortages of 211 stock, many wholesalers and mobile canning operations have substituted them with the 207 format (16 oz Sleek). The 207 can holds the exact same liquid volume but achieves it by being noticeably narrower in diameter and taller in physical height.
If you blindly apply a standard 211 label template (measuring 8.125 inches in width) to a 207 sleek can, you will experience a catastrophic physical overlap. The excess material will cause severe flagging, misalignment, and instant jams in your labeling machinery. You must verify the exact physical SKU of the blank cans arriving at your loading dock before approving any printing proof.
Choosing the Right Label Format: Roll Labels vs. Shrink Sleeves
Before you ever touch a pair of digital calipers or calculate circumference, you must definitively lock in your material process. The fundamental geometry, the printing methodology, and the mathematical formulas used to size your packaging differ entirely depending on whether you are wrapping a 2D substrate around a cylinder or shrinking a 3D tube onto a contoured vessel.
Pressure Sensitive Roll Labels and Material Survival
Pressure-sensitive (PS) roll labels are the backbone of small to mid-sized beverage and food production. Delivered on a continuous release liner, these two-dimensional decals offer incredible flexibility for brands with multiple SKUs, allowing for rapid flavor changeovers and relatively low minimum order quantities (MOQs). Because they are flat, calculating their dimensions relies on straightforward planar geometry.
The Master Roll Label Width Formula
Flat Label Width = (Measured Outer Diameter × 3.1416) + 0.25″ Overlap
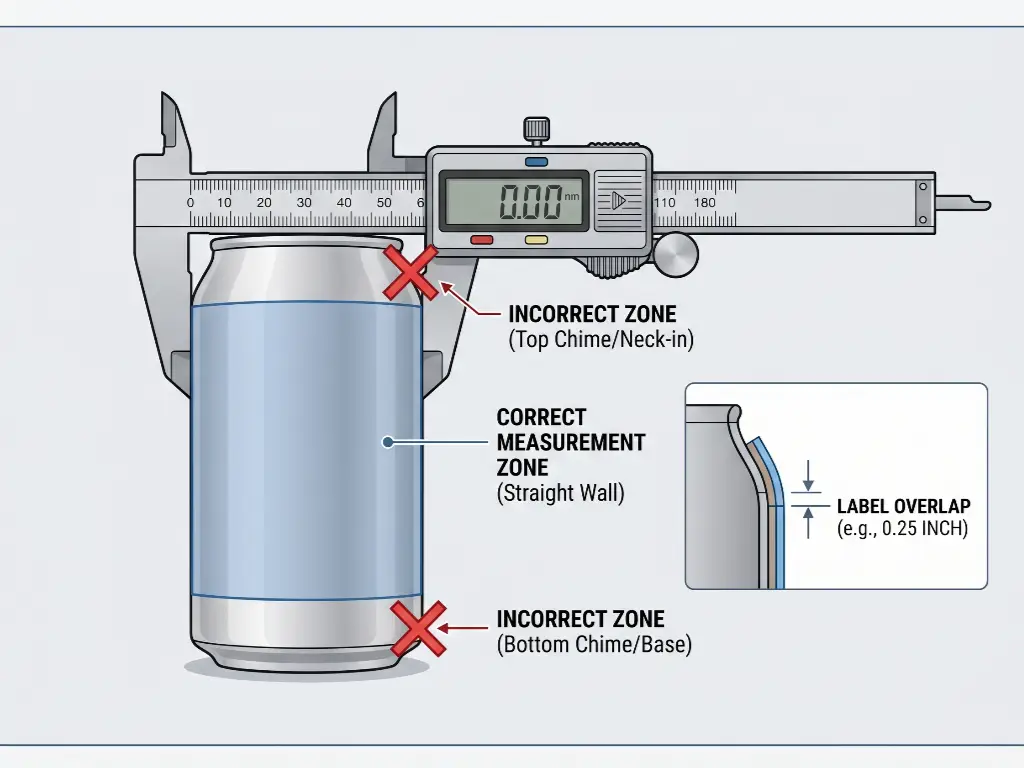
To execute this formula correctly, you must use industrial digital calipers to measure the outer diameter of the can strictly at its straight wall section. Do not measure near the top or bottom curves. Multiply that exact diameter by Pi (3.1416) to find your perfect mathematical circumference. Finally, you must add the overlap. A 0.25-inch (1/4″) overlap is the absolute industry golden standard. This overlap serves as the critical anchor point where the adhesive grips its own face stock, securing the label in place.
However, perfect mathematical sizing means nothing if the material disintegrates in the real world. A critical failure point for new brands is the “Ice Bucket Test” or standard cold-chain logistics. Moving a canned beverage from a 38°F (3°C) commercial refrigerator into a 75°F (24°C) ambient environment triggers immediate and aggressive condensation. The exterior of the aluminum can will sweat profusely.
If you utilize a standard paper label—even one with a basic varnish—the water will penetrate the paper fibers, turning your premium branding into a peeling, pulpy disaster within minutes. For any product experiencing refrigeration or moisture, you must specify BOPP material. White BOPP or Clear BOPP films, paired with an aggressive waterproof acrylic adhesive and a heavy UV lamination (matte or gloss), will completely repel condensation, ensuring your brand identity remains intact from the fridge to the consumer’s hand.
Shrink Sleeves: 360-Degree Coverage and Distortion Rates
When a brand requires 360-degree, edge-to-edge graphical coverage that seamlessly conforms to the complex curves of the container, shrink sleeves are the ultimate solution. Manufactured typically from PETG or PVC films, these sleeves are printed flat, seamed into a continuous tube, dropped over the container, and passed through a highly controlled steam or radiant heat tunnel to shrink tight against the metal.
Discard the Pi formula immediately. Shrink sleeves do not use standard width and height measurements. Instead, they are engineered using two entirely different metrics:
- Layflat Width (LFW): The width of the sleeve when it is pressed completely flat. This is calculated by taking the widest circumference of the can, adding a slip tolerance (usually 2-4mm so the sleeve can slide over the can smoothly), and dividing by two.
- Cut Length: The vertical length of the un-shrunk sleeve before it passes through the heat tunnel. Because the film shrinks vertically as well as horizontally (though at different ratios), the cut length must be engineered slightly longer than the final desired visual height.
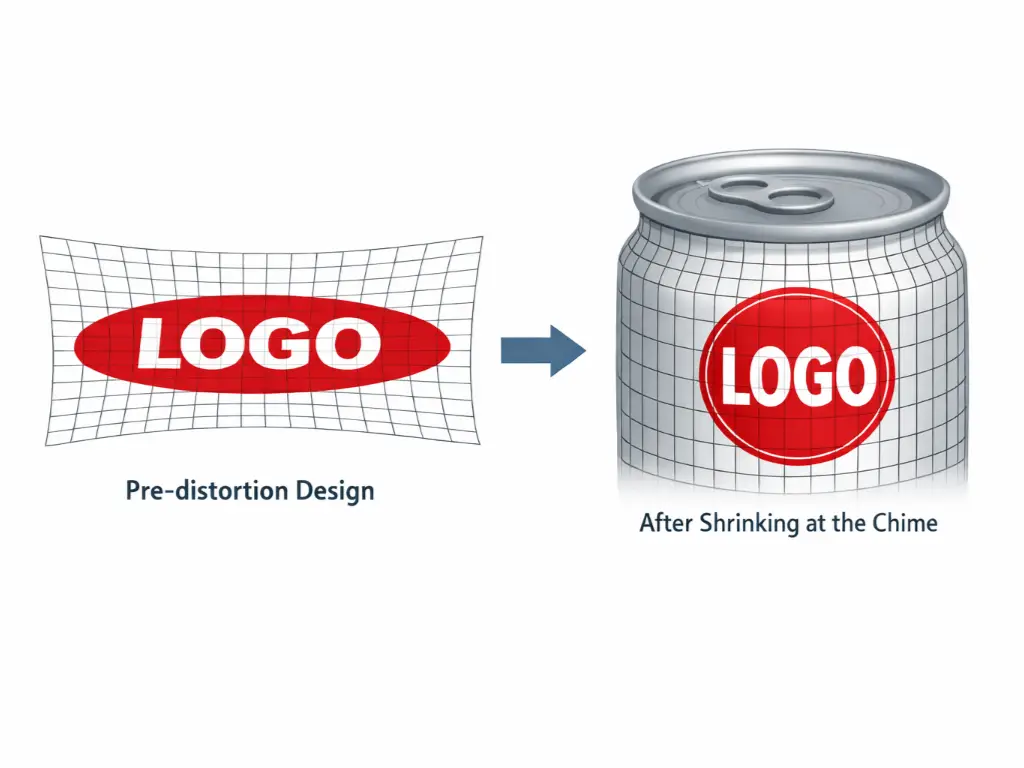
The most unforgiving aspect of shrink sleeve design is Distortion (Shrink Rate). As the plastic tube shrinks aggressively to hug the severe inward curves at the top and bottom of the can—areas known as the “Chime” or “Neck-down”—the printed graphics are pulled and stretched. If you place a perfectly circular logo near the chime in your flat design file, it will mutate into an ugly, stretched oval after the heat tunnel. Pre-press packaging engineers must utilize specialized 3D grid mapping software to intentionally “pre-distort” the artwork in reverse, ensuring that once the plastic shrinks, the graphics look mathematically perfect to the consumer’s eye.
How to Measure Label Sizes for Custom or Irregular Cans
The moment you step away from the standard cylindrical beverage can, the rules of packaging engineering change drastically. Custom and irregular containers—such as rectangular luncheon meat tins, flattened oval seafood cans, or highly tapered industrial pails—cannot be treated with a “measure the circumference and wrap it” mindset. Applying tensioned substrates to sharp geometric angles or complex curves invites catastrophic structural failures.
Panel Labels for Square and Flat Tins
Square or rectangular tins, commonly used for premium edible oils, luncheon meats, and specialty teas, present a unique physics challenge. When you attempt to apply a single, continuous full-wrap pressure-sensitive label around four 90-degree corners, you create severe “memory” tension in the film. The label substrate naturally wants to return to its flat state. Over time, or during minor impacts in shipping cartons, this tension causes the label to “flag”—peeling violently away from the corners.
The professional solution is to abandon the full wrap entirely and utilize a Front & Back Panel Label strategy (two separate decals). When measuring the flat face of the tin, your label width must stop definitively before the corner radius begins. A golden rule of irregular packaging is “narrower is safer.” Ensure the edge of your label rests completely on the flat plane; if even a millimeter of the label creeps onto the curved corner, you provide a leverage point for peeling and friction damage.
Top Labels and Cardboard Sleeves for Seafood Tins
Flattened, oval-shaped tins—the global standard for premium sardines, anchovies, and caviar—suffer from a severe lack of vertical real estate. The sidewalls of these cans are often less than an inch tall and feature aggressive, continuous curves. It is physically impossible, and legally non-compliant, to fit mandatory FDA/USDA nutritional facts, bar codes, and brand storytelling onto these microscopic sidewalls using standard adhesives.
To conquer this geometry, brands deploy two specific strategies:
- The Top Panel Label: A precisely die-cut label applied exclusively to the flat, recessed area of the lid. Measurement must account for the inner lip of the seam, ensuring the label drops perfectly into the flat basin without riding up the metal ridges.
- The Cardboard Sleeve: The most premium and effective solution. Instead of adhesive, a heavy-stock cardboard sleeve wraps entirely around the tin’s outer dimensions. To calculate this, you must measure the total length of the top face, the bottom face, both sidewall thicknesses, and crucially, add a 15mm overlap allowance where the industrial glue will bind the sleeve together underneath.
Procuring Professional Dielines for Tapered Cans
Tapered or conical cans (where the top diameter is wider or narrower than the bottom diameter) represent the ultimate sizing challenge. When a tapered 3D object is unwrapped into a 2D plane, it does not form a rectangle; it forms a mathematically precise, curved fan shape (a geometric frustum).
The only acceptable protocol for tapered cans is to contact your container manufacturer and demand the official engineering CAD drawing. If that is unavailable, the physical container must be laser-scanned by a packaging engineer utilizing CAD software to mathematically generate an exact conical dieline with zero margin for error.
Machine Compatibility: Unwind Directions and Labeling Tolerances
A beautifully designed, perfectly calculated label is completely worthless if your factory machinery cannot digest it. The transition from the graphic designer’s screen to the reality of a spinning production line introduces harsh mechanical constraints. Understanding how labels are delivered and how machines apply them is the final barrier to operational success.
Decoding Label Roll Unwind Positions (#1 – #8)
When you purchase roll labels, they do not arrive as loose sheets; they are tightly wound onto a cardboard core (typically 3 inches in diameter). The specific orientation of the artwork as it unspools from this core is known as the Unwind Direction. The global packaging industry utilizes a standardized numerical system from Position #1 to Position #8.
Your labeling equipment is a rigid system. It expects the label to be fed in a very specific orientation. For the vast majority of cylindrical can labelers, the machine spins the can vertically and wraps the label horizontally. This means your automated or semi-automatic labeling machine fundamentally requires Position #3 (Right Edge Leading) or Position #4 (Left Edge Leading).
If the purchasing manager fails to check the labeling machine’s manual and accepts the printer’s default (which is often Position #1, Top Edge Leading), the results are disastrous. The label web will feed perpendicularly to the machine’s mechanics. Applying a Top Edge Leading roll to a horizontal wrap machine will either instantly jam the optical sensors or result in 100,000 cans being labeled entirely sideways. The only remedy is to halt production and pay a crew to manually rewind miles of label web by hand.
Roll Entry Tolerances for Semi-Automatic Labelers
Many SMEs begin their packaging journey utilizing semi-automatic tabletop labelers, such as the ubiquitous MT-30. While cost-effective, these friction-based roller machines possess incredibly tight mechanical tolerances and are highly susceptible to human feeding errors.
The 0.25″ Overlap Tension Limit: Earlier, we established that a 0.25″ (1/4″) overlap is the maximum allowable standard. The reason lies in the machine rollers. When the label wraps around the can and overlaps itself, it creates a microscopic physical “bump” consisting of two layers of BOPP film and adhesive. If your overlap exceeds 0.25″—say, pushing into 0.5″—the applicator rollers will grip that extended double-thick area too long. This creates a severe tension differential, causing the trailing edge of the label to twist downward, resulting in ugly spiraling (Misregistration) or massive air bubbles trapped beneath the film.
The Chime Hazard Boundary: The height of your label must be fiercely regulated to remain within the Straight Wall of the can. Aluminum cans feature a “Chime” or “Neck-down”—the curved transition where the can body narrows at the top lid and bottom dome. You must engineer a minimum 0.125″ (1/8”) visual safety gap between the top/bottom edge of the label and the beginning of the metal curve. If a semi-automatic roller attempts to press a flat, rigid BOPP label onto the curved chime, the laws of physics dictate that the excess material has nowhere to go. It will instantly fold over itself, creating a permanent, irreversible dead wrinkle, completely destroying the aesthetic value of the product.
Upgrade to Precision Automation
Levapack focuses entirely on delivering high-performance, automated canning and packaging solutions for global SMEs. By replacing erratic friction rollers with advanced servo-driven technology and 2μm-level precision engineering, our automated labeling and seaming systems completely eradicate human-induced wrinkles and overlap misregistration.
We ensures that every single can rolling off your line presents a flawless, premium brand image to the consumer. Stop fighting machine tolerances, and start scaling your output.


