ダブルシームは、缶詰業界では単なるクロージャーではなく、製品と外界を隔てる最も重要なバリアです。食品、飲料、工業製品メーカーの場合、この継ぎ目の完全性が、賞味期限、安全性、ブランドの評判を左右します。
とはいえ、品質管理マネージャーやライン・エンジニアの多くは、ダブルシーム検査の問題を消極的な視点から捉えている。彼らはダブルシームの欠陥に注意を払い、測定値を記録し、不具合を記録し、製品を廃棄する。測定は品質管理プロセスの重要な一部ではあるが、それが答えではない。
不良品をゼロにするためには、検査に対する考え方を最適化へと変える必要があります。ダブルシーム検査から得られるデータは、単なる合否判定ではなく、シーム縫製機の健全性を診断するものです。縫い目の厚み、重なり、ボディフックの長さに変化があれば、それは特定の機械部品、ローラー、リフター、シーチングチャックを交換する必要があることを直接示すものです。
このガイドは、シーム検査データと機械力学のギャップを埋めたいと願う生産管理者やエンジニアを対象としています。生産ラインが正確かつ効率的に機能するよう、製品品質の測定値を実行可能な機械的変更に変換する方法を見ていきます。
ダブルシームの核心的定義
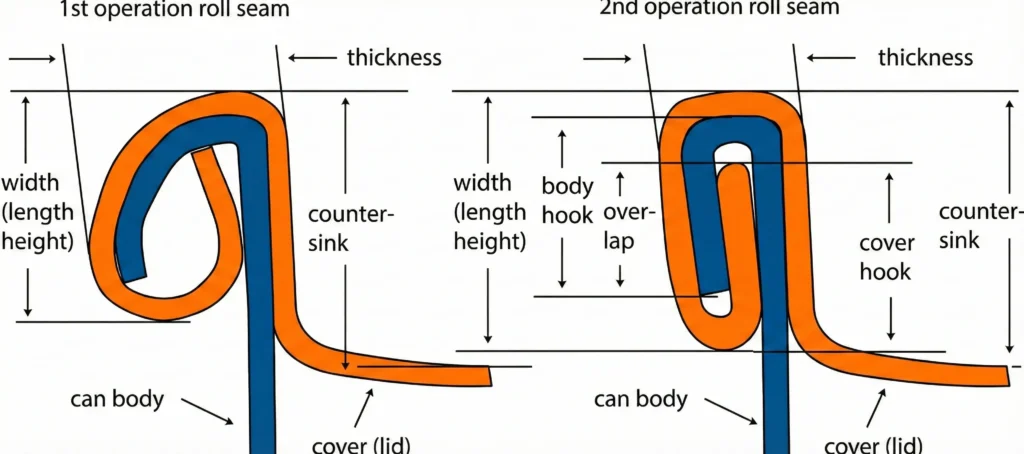
ダブルシーム は、5層の金属を機械的にかみ合わせることによって作られる密閉シールである。これらの層は、缶の両端(蓋)の3層と缶本体の2層である。基本的に、漏れを防ぐためには、これらの金属片を正しく折りたたむ必要がある。
縫製工程は2回行われる。最初の作業では、カバーフックをボディフックに巻き付けることによって最初の構造を作る。これらの層は、2回目の作業で気密シールを形成するために互いに圧着される。縫い目の不具合を診断するためには、この機械的なかみ合わせを理解する必要がある。この5つの層の物理的な重なりが十分でなかったり、2回目のシーム形成が緩すぎたりすると、ダブルシームが漏れてしまう。
検査の方法:目視と破壊の比較
第一に、重大な故障を発見するための定期的な非破壊目視検査、第二に、専用のシーム検査装置を用いて内部の完全性を確認するための定期的な破壊検査である。
- 目視検査(非破壊検査)
頻度: シーミング・ステーションでは15~30分ごと。
目的 重大な事態になる前に、マシンの重大な故障や「ドリフト」を早期に発見すること。
オペレーターは缶を物理的に回転させ、継ぎ目に触れることになっている。あなたが探しているのは
- ドループ: シームがクロスオーバーで下方に滑らかに突出していること。
- ヴィー 鋭い「V」字型の突起で、第一手術の縫い目が緩んでいることを示すことが多い。
- シャープな縫い目: 缶体の上端、縫い目の内側に鋭いエッジがある(チャックに問題があることを示す)。
- スキッダー/デッドヘッド 二重縫いの際に缶が滑った証拠。
- 分解検査(破壊検査)
頻度: シフト開始時(ファーストオフ)、シフト交代時、4時間ごと。
目的 内部のダブルシームの構成要素と気密性を測定する。
手順
- セクション分け: 専用のシームソーで、継ぎ目の断面をカットする。これにより、缶を缶継ぎ目検査装置に載せて、オーバーラップ、ボディ・フック、カバー・フックを測定することができます。
- ストリッピング: シームストリッパー(またはニッパー)を使って、缶体からカバーフックの残りをはがす。
- タイトネス評価: 缶体フックと外したカバーフックの内側を確認する。縫い目のシワが残っているはずです。縫い目の印象が大きい場合は、良い兆候であることが多い。
- シワなし(100%のタイトさ):理想的(あるいはきつすぎる)。
- わずかなしわ(90% Tightness):適度な締まりを示す正常値。
- 深いシワが下まで伸びている(ルース): 失敗だ。
検査指標とシーム機メカニクスのリンク
さて、寸法を測ったところで、それをどう使うか。
FDA(21CFR113)のような規制要件や、ISBTのような業界標準に準拠するために、縫い目には一定の許容範囲が必要です。しかし、スペック外の数値を見るのは半端な戦いではありません。回すべきボルトを知らなければなりません。
重要な業界標準(セーフ・ゾーン)は、それを管理するマシン・コンポーネントと次の表に直接マッピングされています。これがダブルシームの品質に関する主な診断理由となります。
| パラメーター&セーフゾーン(標準) | 定義と重要性 | 機械部分の制御 |
| ボディフック(スペック ± 0.15 mm) | デフ フランジが下向きに曲がっている。 クリティカリティ: インターロック構造の構築に不可欠。 | ファーストオペレーションロール (溝の高さと深さ)。 |
| オーバーラップ(> 1.0 mm / 0.040″) | デフ フック間のインターロックの長さ。 クリティカリティ: 細菌の侵入を防ぐ第一のバリア(リーカー)。 | 第2操作ロール&リフター圧(一次) 第1オペのジオメトリーにも影響される。 |
| タイトネス(> 75% - 80%) | デフ カバーホックにシワがないこと。 クリティカリティ: シーリングコンパウンドが空隙を確実に埋める。 | セカンドオペレーションロール プロフィール (締め付け設定とスプリング圧力)。 |
| カウンターシンク(スペック ± 0.15 mm) | デフ シームトップから蓋の床までの深さ。 クリティカリティ: 縫い目の強度と耐圧性に影響する。 | チャックの高さとアライメント (そしてリフターのスプリングの安定性)。 |
| カバーフック (スペック ± 0.15 mm) | デフ 瞼は上向きに曲がっている。 クリティカリティ: ボディフックと連動し、オーバーラップを生み出す。 | ファーストオペレーションロール (チャックと交流する) |
最初の作業フックの成形(ボディ&カバーフック)
ダブルシームは最初の作業に基づいている。最終的なシールに使用する素材の残量を決定する。特に、ボディ・フックとカバー・フックを構成する。これらは、最終的に互いに接続しなければならない2つの金属構造である。この段階で継ぎ目が短すぎたり、変形していたりすると、2回目の作業で缶を救い出すことができません。
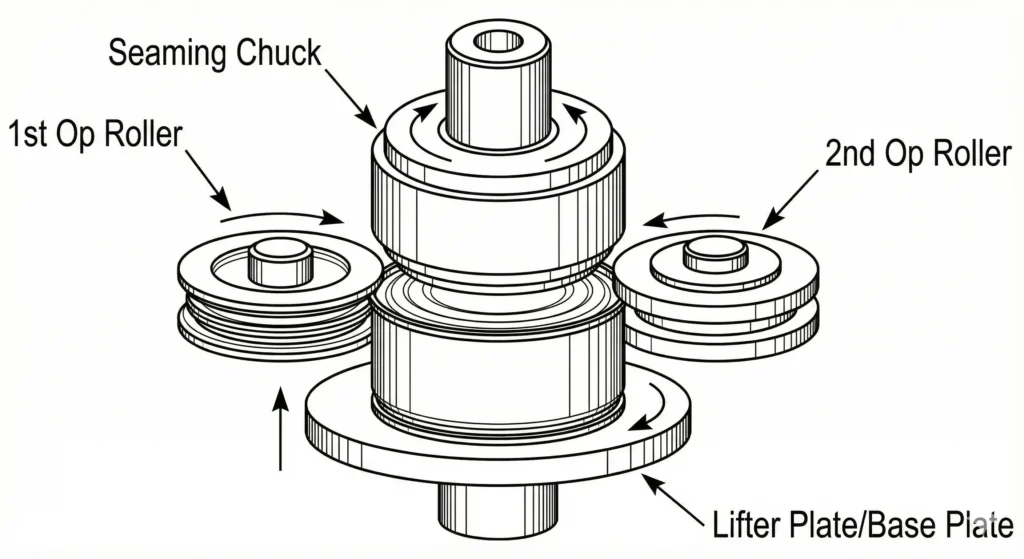
このフックは、最初の操作ロールによってのみ作られる。ローラーは、缶胴フランジの縁の下にある蓋のカールを強制します。曲げられる材料の量は、チャックと比較したローラーの深さ(ピンの高さ)とローラーの溝のプロファイルに依存します。
ボディフックに一貫性がない場合、2つ目の操作ロールを見てはいけない。第一操作ロールをチェックする必要があります。ローラーはベアリングの磨耗でぐらぐらしませんか?ローラーの駆動カムは均一な圧力を与えていますか?
第二の作戦シールの作成(オーバーラップ&タイトネス)
フックは成形後に緩む。2つ目の作業は、オーバーラップ(実質的なシーリング距離)とシームタイトネス(シーラントコンパウンドの圧縮)の原因である。オーバーラップは、缶を切断しなければ直接測定できないが、フックの長さとシームの厚みから計算される。シームタイトネスは、シームをはがし、カバーフックにしわがあるかどうかを調べることによって決定される。
これを制御するのが第2操作ロールである。このローラーのプロファイルは、第一のローラーよりも平らである。第1工程でできた折り目を滑らかにし、しっかりとした縫い目を作るのがこのローラーの役目である。
間違いのひとつは、漏れを塞ぐために間違った圧力をかけることである。圧力をかけすぎると金属が伸びすぎて継ぎ目が緩んだり、重なりが少なくなったりすることがある(アイアニングアウトと呼ばれる欠陥)。目的は適切な圧縮です。これには安定したシームヘッドが必要である。モーター制御がうまくいかず、ローラー圧力が変動すると、一回の生産で不均一な締め付けが生じます。
構造的基盤カウンターシンクとシームの高さ
継ぎ目の上端と蓋の平らなパネルとの間の距離が、カウンターシンクの深さである。外寸の垂直方向の寸法は、継ぎ目の高さです。
これらの寸法は、マシンの垂直方向の安定性を示すものです。シーミングチャック(プレスヘッド)とリフター(ベースプレート)がこれらをコントロールします。
蓋はチャックで保持され、缶胴はリフターで押し上げられる。リフターのバネが弱すぎると、缶がシームで横滑りしたり倒れたりして、ボディフックが長くなり、シームの高さが短くなります。チャックがローラー上で完全にセンタリングされない限り、カウンターシンクは直径の周囲で不均一になる。
トラブルシューティングガイド検査データから機械の故障を診断する
検査装置が検出した欠陥は、生産ラインを停止させる原因となる。問題の原因を早く特定すればするほど、ダウンタイムの支払いは少なくなります。以下は、一般的な欠陥データを機械的ソリューションに変換するためのロードマップです。
| 検出された欠陥 | 考えられる機械的原因 |
| シャープシーム | チャックの位置が低すぎるか、チャックリップが磨耗している。 |
| 低いオーバーラップ | セカンドオペレーションロールが緩んでいるか、リフター圧が低い。 |
| フォールス・シーム | フランジの損傷またはベアリングの遊び(ぐらつき)。 |
| デッドヘッド(スキッダー) | リフター圧が低すぎるか、チャックがスリップしている。 |
チャックのアライメント調整によるシャープシームの修正
縫い目の内側上端に鋭いエッジが感じられる。これは消費者にとって危険であり、通常は縫い目を切り裂き、即座に漏れを引き起こす。これはほとんど常にチャックの問題である。
- 垂直アライメントをチェックする: チャックがローラーに対して低すぎるのでしょう。そのため、金属がチャックのリップを越えて激しく曲がる。ピンの高さの設定を上げる必要があります。
- 摩耗を点検する: チャックのリップを調べる。エッジが欠けていたり、不均等に摩耗していると、金属を切断してしまう。
ローラーの締め付けによる低いオーバーラップの解消
この計算は、オーバーラップが十分でないことを示している(1.0mm以下、あるいはあなたの基準が何であれ)。これはフックが十分に深く引っかかっていないことを意味する。この場合、カバーフックの半径をチェックするなど、多段階の検証が必要となる。
- リフター圧をチェックします: 缶が滑り落ちるとき、ボディフックが形成されていない。ベースプレートのバネにテンションをかけてください。
- セカンドオペレーションロールを調整する: フックが重なっておらず、十分な長さがある場合、セカンドオペレーションロールは十分に深く押し込むことができない。ローラーは、目に見える圧力畝を確保するために締め付ける必要があります。
- 警告だ: 締めすぎないこと。締めすぎると金属が伸び、オーバーラップが小さくなる。微妙なバランスで、安定したマシンフレームが必要です。
偽の継ぎ目を修正するベアリングとフランジの問題
外見上、継ぎ目は完璧に見えるが、解体してみると、ボディ・フックとカバー・フックは接触すらしていない。缶は密閉されていない。これは重大な安全上の欠陥である。これは通常、機械的な傾きやサイクルのズレが原因である。
- ベアリングのチェック ローラーベアリングに遊びがあると、ローラーが缶の継ぎ目に当たって跳ね返り、圧縮されないことがある。
- 切込みをチェックする: シーマーに当たる前に缶のフランジが曲がっていると、フックがかみ合いません。スターホイールとタレットのタイミングをチェックする。
統合された品質プロトコル:毎日のセットアップと検査ワークフロー
ルーチンは一貫性の結果です。不良品を減らすためには、ダブルシーム検査を毎日の機械セットアップのワークフローの一部にする必要があります。このプロトコルは、不良缶をキャッチするビジネスから、不良缶を防止するビジネスへとあなたを導く。
フェーズ1:始動前のマシンチェック(目視方式)
オペレーターは、機械が1缶を運転する前に、目視監査を行うべきである。測定されるのは缶ではなく、機械の準備状態である。
- 瓦礫のチェック ローラーとチャックにアルミの粉やラッカーが付着していないか確認する。このゴミが工具の有効径を変え、継ぎ目の寸法を変える。
- 工具の状態: チャックリップに欠けがないか目視点検する。
- 潤滑: すべての可動部品に注油する。
フェーズ2:「ファーストオフ」キャリブレーション(破壊的方法)
適切な縫い目検査用具を使用した解体作業なしに本生産を開始しないでください。
- ウォームアップだ: ミシンを5~10分間作動させる。シーマーは熱でわずかに膨張します。
- 解体: 最初の3缶を連続して取り出す。完全な破壊テストを行う。
- キャリブレーション: 締め付け力が100%(または標準)でない場合、第2操作ローラーのバネ力を一度に変更してください。ファーストオフサンプルが完璧になるまで続行しないでください。
フェーズ3:インターバルモニタリング(非破壊・サンプリング)
生産が始まると、すべての缶を解体することはできない。
- 頻度: 高速ライン(当社の50缶/分モデルなど)では30分ごとにチェックしてください。低速ラインの場合は1時間で十分です。
- データロギング: これらの間隔を記録する。ある傾向(例えば、縫い目の高さが徐々に上がっている)に気づいたら、それは機械がドリフトしていることを意味します(ロックナットが緩んでいるか、リフタースプリングが加熱している可能性があります)。
迅速な機械校正のための検査ツールの選択
手動ツールと自動システムはしばしば議論の対象となる。私たちは、技術よりもむしろ、フィードバック速度によってツールを選択することを推奨している。これは、オペレーターが機械を調整できるように、データが迅速に提供されるようにするためである。
- 手動工具(マイクロメーター/ノギス):
- 長所だ: 安価で耐久性がある。
- 短所だ: 主観的(オペレーターによって測定が異なる)、時間がかかる、手動のデータ記録。
- ユースケース 少量のスタートアップやバックアップに最適。
- 自動ビジョンシステム(シームモニター):
- 長所だ: 客観的で極めて高速なデジタル・データ・ストレージ。
- 短所だ: イニシャルコストが高い。
- ユースケース トレーサビリティが求められる本格的な生産ラインには欠かせない。
最も有用なツールは、ワークフローに適合するものである。5万円もする自動検査装置も、データがコンピューター・オフィスに保存されているのでは何の役にも立たない。シーマーはモニターの横にいるべきだ。システムがローボディフックのシグナルを出したら、オペレーターは最初の操作ローラーを検査する必要があることを認識しなければならない。
必要のない技術に過大な投資をしてはならないが、品質管理を過小評価してはならない。1分間に20缶をシールする工芸品製造業者のプロトコルは、500缶をシールする飲料工場と同じではない。
以下のマトリックスは、あなたの生産レベルで使用する適切な検査セットアップを特定するために使用することができます:
| 生産規模 | 標準出力(CPM) | 推奨検査セットアップ | バリュー・プロポジション |
| マイクロ/パイロットライン | < 15 CPM | 手動マイクロメーター+シームソー | 低資本コスト:オペレーターがサイクルの合間に手動で缶を測定する時間が十分にあるビジネスに最適。 |
| 中小企業 | 20 - 80 CPM | デスクトップビデオシームモニター(VSM) | 正確さとスピード:必要なデジタル監査証跡を提供し、インライン自動化のコストをかけずにオペレーターのミスを排除します。 |
| ハイボリューム | 100+ CPM | インラインX線またはフルオートビジョン | リアルタイムサンプリング:統計ドリフトを即座に検出。 |
結論
ダブルシーム検査は数字を書き込む受動的な作業ではなく、機械との能動的な相互作用である。検査記録におけるいかなるミクロン単位のばらつきも、それがローラーのセッティングであれ、スプリングであれ、チャックであれ、機械があなたに何を求めているかを伝えるつぶやきなのです。
とはいえ、高品質の機械は完璧な縫い目の基本である。構造的に剛性がなかったり、部品の精度が悪かったりするシーマーは、いくら調整しても直らない。
レバパックにて、 私たちは単に機械を販売するだけでなく、安定性を提供します。2μm精度のCNC機械加工部品、高級サーボ制御、頑丈なステンレス鋼構造により、当社のカスタム缶詰ソリューションは、シフトごとに設定を維持できるように構築されています。私たちは100カ国以上のメーカーをサポートし、不具合のトラブルシューティングから生産の最適化までを支援します。
継ぎ目の検査に合格するために、古い機器を常に微調整することにうんざりしていませんか?
今すぐLevapackにご連絡ください。お客様の特定の製品や工場レイアウトに合わせた、高精度で欠陥ゼロの缶詰ソリューションについてご相談ください。パウダーからペーストまで、私たちはお客様の成功を封印するエンジニアリングの専門知識を持っています。


